Friday, September 30, 2011

Some Awesome Pics

So, a couple of days ago, I was over at my friend, Jeannine's house & she asked if I wanted to see a project her son, Devon, had finished this summer. His project was to make his little brothers & sisters a playhouse. He had come over at one point to borrow a certain saw to cut an angle for the eaves, so I had known about it. I have to admit, it is pretty great!

He even made the stained wood floors look uneven to look like they are old! There are old strap hinges for the door with an automatic closing spring installed on it. I love that he has it up on a few blocks so that it won't have water damage either. The roof is galvanized tin & apparently they love it, because it is christened inside with their names in chalk on one wall! I think he did an amazing job. What do you think?

The following pic is one of their chicken coop that he built last year. I especially like the watering system they have. I don't have one nearly as nice, and I have plans to install one like it in my coop for my little birdies.
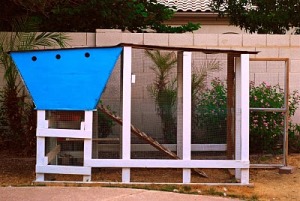
As you can see, on the left of the picture, outside the chicken coop, is a 5 gallon bucket. What you cannot see, is that it has a lid with a screw top cover so you can easily fill with water, or put a frozen water bottle in there to keep the water cold. We all know that chickens do not like their water too hot, and here in Arizona, it definitely is HOT. Anyway, on the side of the bucket, near the bottom Devon drilled a hole large enough to insert a PVC pipe into it. The point that the PVC goes into the bucket is then sealed with a plumbing putty, or water tight glue. The PVC pipe then has an elbow attached to another longer piece of PVC pipe about 2 1/2 feet long with an end on it. This piece is the piece with 3 nipples on it. These the chickens go up and peck. As they peck, water comes out. No more shavings or dirt in the water! YAY! I love it! One thing they did say they would do a little different is to raise the bucket up higher to increase the water pressure as it comes out.
This is the link to purchase the nipples online. My friend Jeannine bought them at Farmtek.

Friday, September 16, 2011

Printable Cards


These are a few of my printable cards I have been working on. I hopefully will have them available for download next week. It is so convenient to have cards at the ready, and be able to print them, but not have to sit down and make them. After all, is the card what matters, or the message in the card?

Wednesday, September 14, 2011


My daughter got a sewing machine for her birthday, and she has been sewing some stuffed animals for the kids she babysits. I think they turned out so cute. Not pictured was the gorilla. She gave that one before I could get a pic. What do you think?
She got the patterns from "Wild and Wonderful Fleece Animals" by Linda Carr available at Amazon.com. The book has so many patterns in it. They are all fairly easy.

I have consolidated my blogs

I have debated a long while over what to do, and have finally decided to consolidate my two blogs. I just have not had the time to maintain them, and keep up with everything I want to do. So, for those of you who still wish to talk about organic gardening, come visit me at www.thedelightfulday.blogspot.com. I look forward to seeing you there!

Pumpkin Cookies


These are my absolute favorite pumpkin cookies. We made 2 batches of these on Sunday, which is almost 8 dozen cookies, and they were gone by Monday nite. (Not by me eating them, I promise!)
Here is the recipe (it came from allrecipes.com although I use a different frosting):

Pumpkin Cookies
2 1/2 cups all purpose flour
1 teaspoon baking powder
1 teaspoon baking soda
2 teaspoons ground cinnamon
1/2 teaspoon ground nutmeg
1/2 teaspoon ground cloves
1/2 teaspoon salt
1/2 cup butter, softened
1 1/2 cups white sugar
1 cup canned pumpkin puree
1 egg
1 teaspoon vanilla extract

Preheat oven to 350 degrees F. Combine flour, baking powder, baking soda, cinnamon, nutmeg, ground cloves, and salt; set aside.
In a medium bowl, cream together the 1/2 cup of butter & white sugar. Add pumpkin, egg, and 1 teaspoon vanilla to butter mixture, and beat until creamy. Mix in dry ingredients. Drop on cookie sheet by tablespoonfuls; flatten slightly.
Bake for 15 to 20 minutes in the preheated oven. (My oven is hotter so I bake them for 13 minutes). Cool cookies completely before frosting with cream cheese frosting.

Cream Cheese Frosting
1/4 cup butter, softened
4 ounces cream cheese, softened
2 cups confectioners' sugar
1 teaspoon vanilla extract

In a medium bowl, combine butter and cream cheese. Slowly add confectioners' sugar & then add vanilla. Frost cookies. Unused portion may be kept in the refrigerator for up to a week.


The Nie Nie Skirt, by Pink Fig Patterns

A few weeks ago, I decided to make my nieces a skit. This was one that I made for my 8 year old niece. It was made from the pattern, "the Nie-Nie Skirt". It looks kind of difficult, but if you have a ruffler attachment, which I highly recommend, it makes quick work of all those pesky ruffles. Apparently, my niece wore it all day for 2 days in a row. That's how much she loved it!

Summer Activities

This summer was exceptionally busy. Because there was so much that we did, & made, I just simply didn't have time to update my blogs. I say blogs because I have for the last little while maintained (not very well), 2 separate blogs. The first, www.azgardengirl.wordpress.com & the second, www.cutecoolcrafts.blogspot.com, are now going to be consolidated into this one blog. I think that will work a lot better for me.

The whole first part of June was taken up with girls camp. Some of the things we did were little individual backpacks for the girls, with their name embroidered onto felt and fabric glued onto the backpack. Those worked really great. We used the pattern found on this link: http://reannalilydesigns.com/2009/10/fat-quarter-drawstring-backpack/. At first I wasn't sure it would work well for a hike, with a water bottle and snacks, etc. in it. I myself put 2 regular sized water bottles in it, as well as snacks and a few other things, and it worked very well. This was one thing I would definately do again. It really didn't take that much time with 2 people sewing to get them put together, and it was a lot cheaper than buying them, if you used some discount or sale fabric. For the straps, the directions on the pattern say to use ribbon, but we went to our local store and bought some cotton clothes line at 100 ft. for about 3 dollars. It worked well. There weren't any problems with the clothes line digging in to our shoulders or anything. The one thing we did adjust was to add some inches if a girl was a little bit larger, to make it more comfortable. But, that was the only change. Below is a picture of my backpack. We made them for the leaders as well, which was nice to keep all our stuff together. You can see mine has flowers pinned onto it. Those flowers are made using wired ribbon, and by pulling the wire out of one side of the ribbon, you can wind the ribbon on the side with the wire, getting this flower effect. It really is super simple and turns out amazing.
We also made the girls little journals that we gave to them. These were a lot of effort, but they were pretty neat. As you can see, they had a front cover and a back cover that went with our theme. The inside was divided into sections: Journal, Notes, Pictures, & Certification. That way, the girls could print off their pictures and put them into the journal as well. We did give them some time to write a note to each other, but that didn't happen as often as we wanted, because we were just too busy.


We also made a flag, and since our ward's name was
"The Royal House of the Believers," the girls came up with things they would like on their flag that showed what they believed in. And then, we had a committee that worked on it. I think they did a great job. When they unveiled our flag, everyone gasped! It was awesome. We also had an entrance into our camp. Our entrance was definately NOT the most elaborate of all of them, but it worked just fine.
We took the sign at the left, & put it atop 2 pillars. It looked great.
To make this sign, so it wouldn't rip (which was a good thing, because this year it was sooo windy), we just took some inexpensive white fabric and transfered the letters on and painted it with black paint. I think it only cost a couple of dollars to make. It is hard to see, but it says, "House of the Believers". We also hung it up in our camp during the week.
One other thing we did, was paint a background onto a sheet that we could hang up inside of our eating area. This also was pretty cheap, just the cost of a sheet from a thrift store. As it happens, I had a sheet already, that we used.
I bought a Yudu screenprinting machine. It can be viewed at this link: http://www.whatdoyudu.com/. At first, I found it a little difficult to use, having never screenprinted before. However, after doing 40 of these shirts, my friend and I got the hang of it. Since then, I have also tried some other types of inks. I really like opaque ink from Speedball. I purchased them from http://www.dharmatrading.com/ and they were great. I didn't really like the regular inks from Speedball as much, but it might be that I have gotten used to a thicker ink and the regular Speedball ones are pretty thin.

One more thing we did, which was I really liked, and actually was a lot of work was make matching pj bottoms for everyone. It may sound like it could be expensive, but we found some sheets at a good price so it worked out to be about $1.5o for each pair. This is what my pair looked like, which was the only one with little ruffles on the bottom.